Tuesday 27 July 2010

Tri-Fold Mini Books

We are back from Paris... wow what an amazing city! We had the most amazing time and brilliant weather too (35 degrees on a couple of days!) I'm sure the photos will be appearing on layouts shortly.

As promised here are some of the photos of the ladies mini books from the Cre8tive crop just over a week ago and some of the ladies working hard. Can you tell from the photos that they worked hard!?!

Friday 16 July 2010

Sneak Peak

Here is a sneak peak of the colours for the class tomorrow.
I'll show you what the ladies do with it in about a weeks time when I get back from Paris!

Thursday 15 July 2010

Misting Class Layouts

Here are some of the ladies layout from the class last weekend. I didn't manage to photograph them all but it is nice to see what some of the others did with the class.

Mandie scrapped a lovely photo of her daughter, while Elizabeth scrapped a photo of somewhere they had been and Viv scrapped one of her daughters wedding photos. I think you'll agree they all look great.

My top tip for misting is to have a cardboard box ready to mist into. This saves a lot of hassle putting down scrap paper or turning the lawn a nice shade of pink! If you have a nice big box you can spritz from a decent height (12" is good) and get a nice fine mist. If you spritz closer you will get a more blobby intense look which can be good too.

Wednesday 14 July 2010

Knotted Ribbons

A very short quick post today to let you know that the lovely knotted ribbons are now back in stock and loaded onto the website ready for you to order. They come in 6 different colours white, cream, lemon yellow, baby pink, baby blue and lavender. You can find them here.

Tuesday 13 July 2010

Sunshine Award

I have been given a sunshine award by my friend Sue... Thanks Sue! Sue has just recently restarted her blog and I am sure there will be lots of ideas and inspiration coming on there as she is a prolific scrapper. I would in turn like to pass the award on to some of my blogging friends...

Clare, Sarah, Rachael, Irene


I'm meant to pass it on to 12 friends but I only have 4!! How sad!

Friday 9 July 2010

Warning Inky Fingers!

As promised here is the step by step instructions for making the flowers I have been using recently.
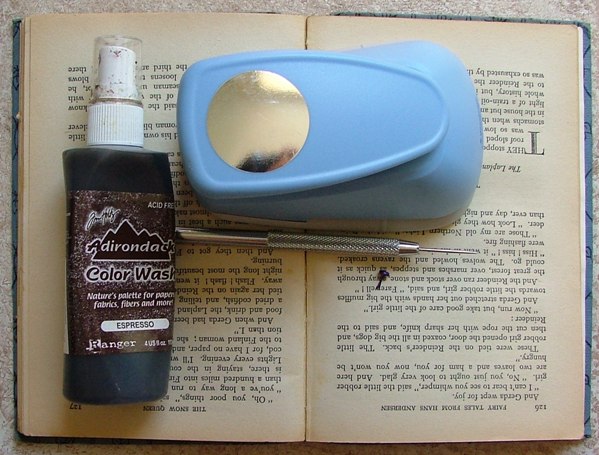
You will need...
  • A circle or scalloped circle punch (on my cards I used the super scalloped circle, for this demo I have used the super circle from Woodware)
  • An old book (yellowed pages are good!)
  • Paper Piercer
  • Brad (any colour will do as you don't see it)
  • Mists (on this example I used Adirondack Espresso and then decided I wanted to add a second colour so added Radian Rain Mister Fern)
  • An old cardboard box (or lots of scrap paper)
Step 1

Punch out 6 circles from your book. Stack the circles roughly on top of each other. They don't have to line up.

Step 2

Using your paper piercer make a hole roughly in the middle all the way through the stack of circles. Add a brad to hold the circles together.

Step 3

Lift the edges of just the top circle and scrunch into the middle into a tight knot in the middle. It should cover the brad. Spritz the flower in your box and then scrunch the second layer into the first. If you don't like getting inky fingers then you will want to wear gloves for this stage.

Step 4

Repeat for each subsequent layer. If you are using a dark colour of mist like the espresso you may want to mist only every other layer.

Step 5

Make sure you leave the final layer flat as this is what you will use to stick your flower down. You can leave your flower like this and it would be done or continue as below...
Step 6

Un-crumple your flower and re-crumple one layer at a time so that you have some of the paper with no ink showing revealed. Again you can leave the flower like this 
or if you prefer as I have done add a second colour of mist. I added a lighter colour and one with some glimmer in it (the Adirondack mists are the only ones I know of that don't have glimmer in them.)

Wednesday 7 July 2010

Misted Layout

At the weekend I attended the Littlegreen retreat in West Sussex. I taught a class on Saturday on how to use misters and we made a layout too. Here is my layout....
We used the mists to make the background and the coloured circle and we used them to colour most of our flowers. We made the large flower and misted it as we went and we also misted the small white flowers so they tied in with the colours in our layout. Here are some close ups of different parts of the page.
The handmade flower.
I used punchenella to mask the background as I was misting.
New to the shop knotted ribbon. The ladies loved it so much I sold out over the weekend but will have more in stock soon.
These blue flowers were white to start off with and we spritzed them to match our layout.
I do still need to add a title and the journalling (need to check the date). I'll upload some of the layouts from the class soon so you can see what everyone else did.

Supplies list (with links)
American Crafts White Cardstock
Misters - Glimmer Mists, Cosmic Shimmer or Radiant Rain
Small white flowers
E-Line flowers
Pearls (for flower centers)
Metallic Brads (also for flower centers)
15mm Ribbon
Knotted Ribbon (Will be here when back in stock!)
Scalloped punch to make flower
Glue dots for sticking knotted ribbon down

Monday 5 July 2010

Same but different

I have taken to making at least 2 cards if I am making a quick card as I have to get everything out each time so it makes sense to do more than one. Here is the other card I made at the same time as the Thank you card from my last post. See the cute flower again!
I wanted to soften the edges of the stamped greeting so I used the same colour I stamped with and a sponge dauber and in a circular motion added a bit of colour to the edges. I love the fact that the same colour is light enough for the original stamped image to show through.

Friday 2 July 2010

Thank you card

Where has the time gone? It is over a week since my last post! My father in law has been in hospital so I have been busy with the family but I have been crafting too... just not had time to upload anything. I'll try and upload some of the projects from the last week over the next few days. First, a card which I made for my middle son's teacher who left on maternity leave on Thursday. Hot weather to be pregnant in and I'm sure she will enjoy the peace and quiet at home before the little one makes an appearance. Here is the card I made... my son made the flower... they are easy peasy. I'll put a little tutorial up at some point soon (especially as they feature in other projects).